By default, a clean installation of OTRS 3.1.x does not include any dynamic fields. If you plan to use such fields in tickets or articles you need to create dynamic fields.
An updated installation from OTRS 3.0.x will have all the old "free fields" created as dynamic fields for compatibility and data preservation. The following is the list of dynamic fields that are created during the migration from OTRS 3.0.x to 3.1.x.
TicketFreeKey[1-16] (TicketFreeKey1, TicketFreeKey2 ... TicketFreeKey16)
TicketFreeText[1-16]
TicketFreeTime[1-6]
ArticleFreeKey[1-16]
ArticleFreeText[1-16]
Note
During the migration procedure from OTRS 3.0.x to OTRS 3.1.x all the old "free fields" data and configuration are migrated to the new dynamic fields architecture. Any custom development around the old "free fields" has to be updated to use the new dynamic field framework.
The migration of the configuration include the field itself and the screen configurations to hide, show or show field as mandatory for each screen.
The configuration of a dynamic field is split in two parts, to add a new dynamic field or manage an existing one you need to navigate into the "Admin" panel in the "Dynamic Fields" link. To show, show as mandatory or hide a dynamic field in one screen you need to change the OTRS settings in the "SysConfig" screen.
Click in the "Admin" button located in the navigation bar, then click on the "Dynamic Field" link inside "Ticket Settings" box located in the lower center of the screen. The dynamic fields overview will display as follows:
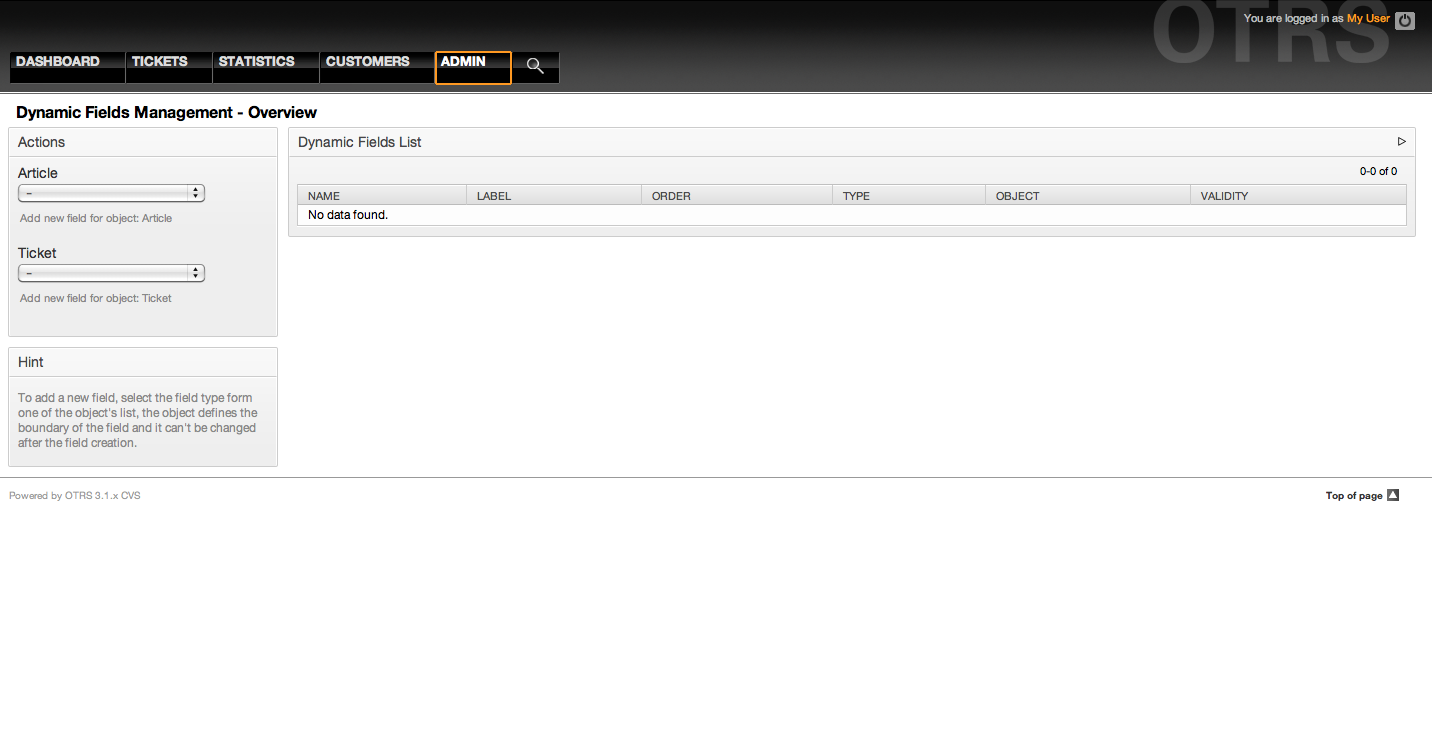
Figure: Dynamic fields overview screen, empty.
Notice that this screen will change as you add more dynamic fields to list all created dynamic fields. This screen might already have some fields if the installation was updated from an older version of OTRS.
The Actions in the side bar at the left of the screen describes two possibilities: Article and Ticket, each one has it's own dropdown selection of dynamic fields.
Note
The installation of an OTRS package could add more objects to the Action side bar.
The general procedure to create a dynamic field is:
Click on the desired dynamic field object dropdown in the Action side bar.
Click on the dynamic field type that you want to add from the list.
Fill the configuration.
Save.
The configuration dialogs for the dynamic fields are split in two parts, the upper section is common among all the fields and the lower part might be different from one type of dynamic field to another.
General dynamic field settings:
Name: Mandatory, unique, only letters and numbers are allowed.
This is the internal name of the field, used for example to show or hide a field in one screen. Any modification on field name (not recommended) will need manual a update on the "SysConfig" settings where the field is referenciated.
Label: Mandatory.
This is field name to be displayed in the screens, it supports translations.
Note
Label translations have to be added manually to language translations files.
Field order: Mandatory.
Defines the relative order in which the field will be displayed in the screen, by default each new field has the last position, a change in this setting will affect the other of the other created dynamic fields.
Validity: Mandatory.
An invalid dynamic field will not be displayed in any screen, no matter if is configured to displayed.
Field type: Mandatory, Read only.
Shows the current selected field type.
Object type: Mandatory, Read only.
Shows the scope of field.
Note
To illustrate each specific field type settings a few fields will be added in our example. These new fields will be referenciated in later sections.
For the following examples all the dynamic fields will be created for the Ticket object if you need to create a dynamic field for Article object, just chose the field from the Article dropdown list.
Table 22.1. The following fields will be added into the system:
| Name | Label | Type |
|---|---|---|
| Field1 | My Field 1 | Text |
| Field2 | My Field 2 | Textarea |
| Field3 | My Field 3 | Checkbox |
| Field4 | My Field 4 | Dropdown |
| Field5 | My Field 5 | Multiselect |
| Field6 | My Field 5 | Date |
| Field7 | My Field 6 | Date / Time |
Text dynamic field is used to store a single line string.
Text dynamic field settings:
Default value: Optional.
This is the value to be shown by default in the edit screens (like New Phone Ticket or Ticket Compose).
Show link: Optional.
If set, the field value will be converted into a clickable link for display screens (like ticket zoom or overviews).
For example, if "Show link" is set to "http://www.otrs.com", clicking on the filled value will make your browser to open the OTRS web page.
Note
The use of $LQData{"NameX"} in the Set link value, where NameX is the name of the field will add the field value as part of the link reference.
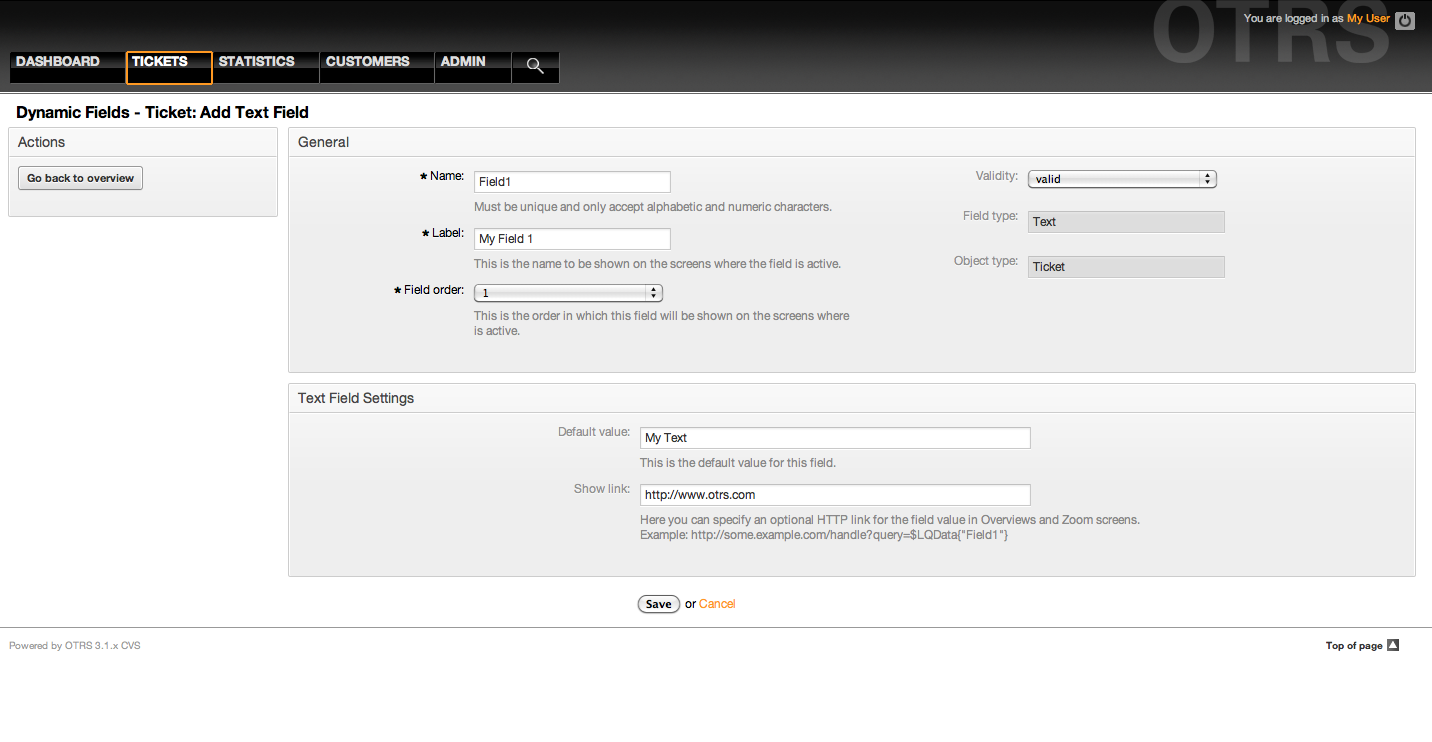
Figure: Dynamic field Text configuration dialog.
Textarea dynamic field is used to store a multiple line string.
Textarea dynamic field settings:
Number of rows: Optional, integer.
Used to define the height of the field in the edit screens (like New Phone Ticket or Ticket Compose).
Number of cols: Optional, Integer.
This is value is used to define the width of the field in the edit screens.
Default value: Optional.
This is the value to be shown by default in the edit screens (it can be a multiple line text).
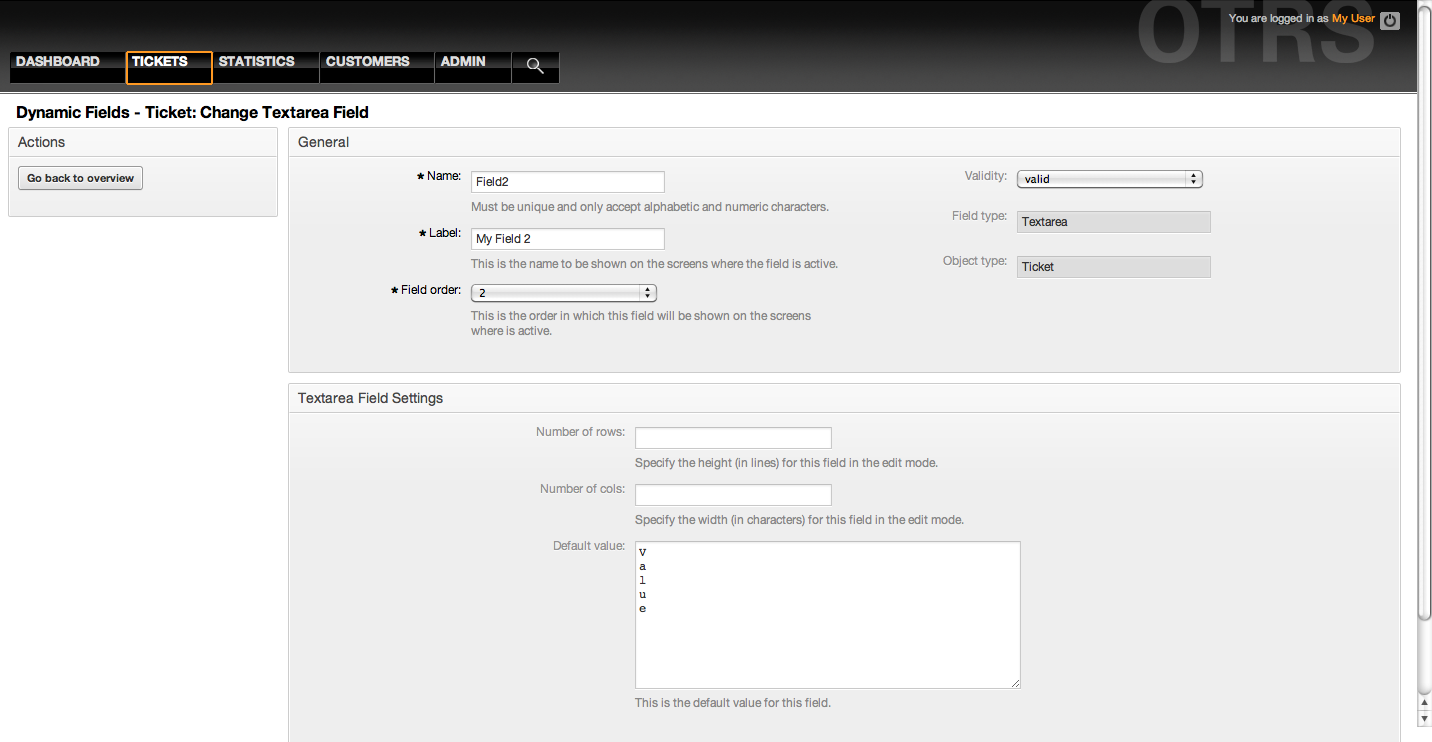
Figure: Dynamic field Textarea configuration dialog.
Checkbox dynamic field is used to store true or false value, represented by a checked or unchecked check box.
Checkbox dynamic field settings:
Default value: Mandatory.
This is the value to be shown by default in the edit screens (like New Phone Ticket or Ticket Compose), the default value for this field is closed selection that can be Checked or Unchecked.
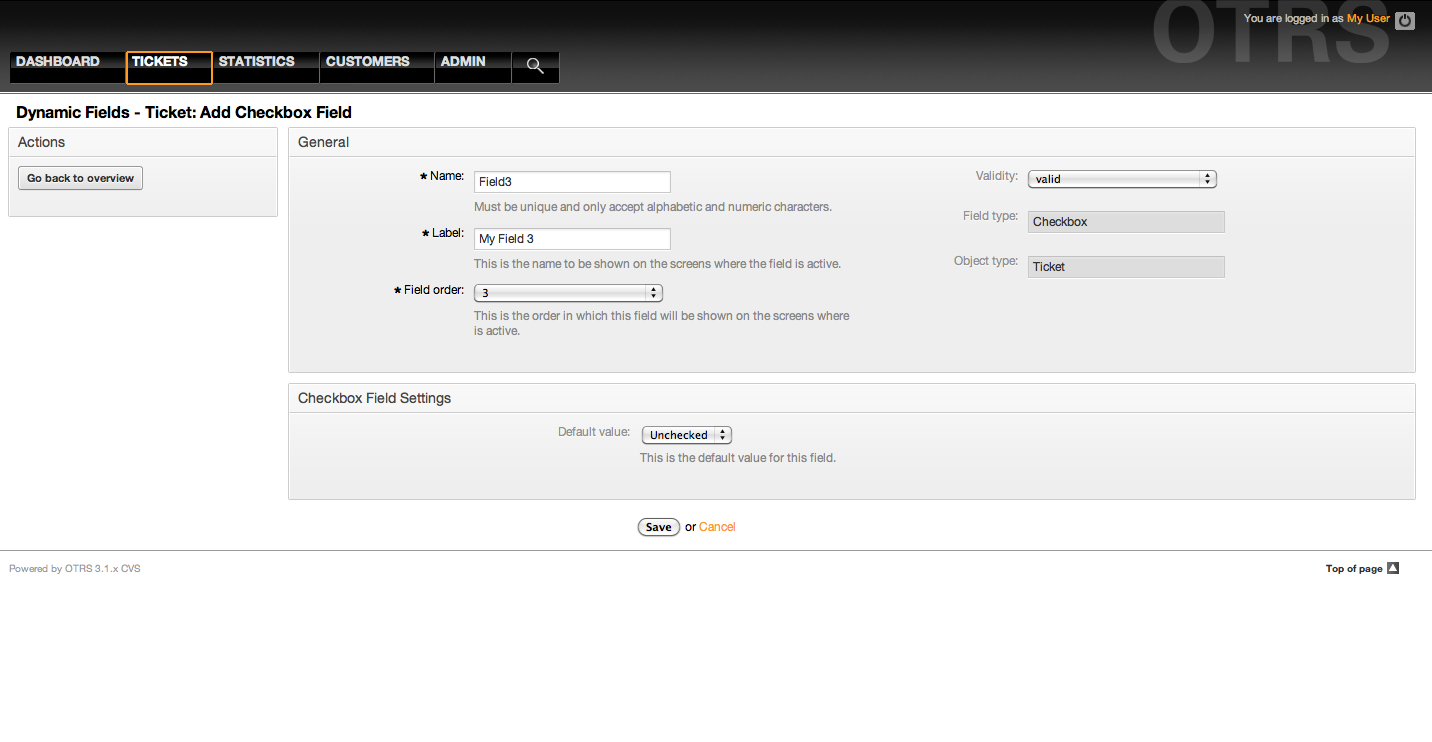
Figure: Dynamic field Checkbox configuration dialog.
Dropdown dynamic field is used to store a single value, from a closed list.
Dropdown dynamic field settings:
Possible values: Mandatory.
List of values to choose. when add a new value is necessary to specify the Key (internal value) and the Value (display value).
Default value: Optional.
This is the value to be show by default in the edit screens (like New Phone Ticket or Ticket Compose), the default value for this field is closed selection defined by the Possible values.
Add empty value: Mandatory, (Yes / No).
If this option is activated an extra value is defined to show a "-" in the list of possible values, this special value is empty internally.
Translatable values: Mandatory, (Yes / No).
This setting is used mark the possible values of this field to be translated. Only the display values are translated, internal values are not affected, the translation of the values needs to be manually added to the language files.
Show link: Optional.
If set, the field value will be converted into a clickable HTP link for display screens (like Zoom or overviews).
For example, if Show link is set to "http://www.otrs.com", clicking on the filed value will make your browser to open the OTRS web page.
Note
The use of $LQData{"NameX"} in the Set link value, where NameX is the name of the field will add the field value as part of the link reference.
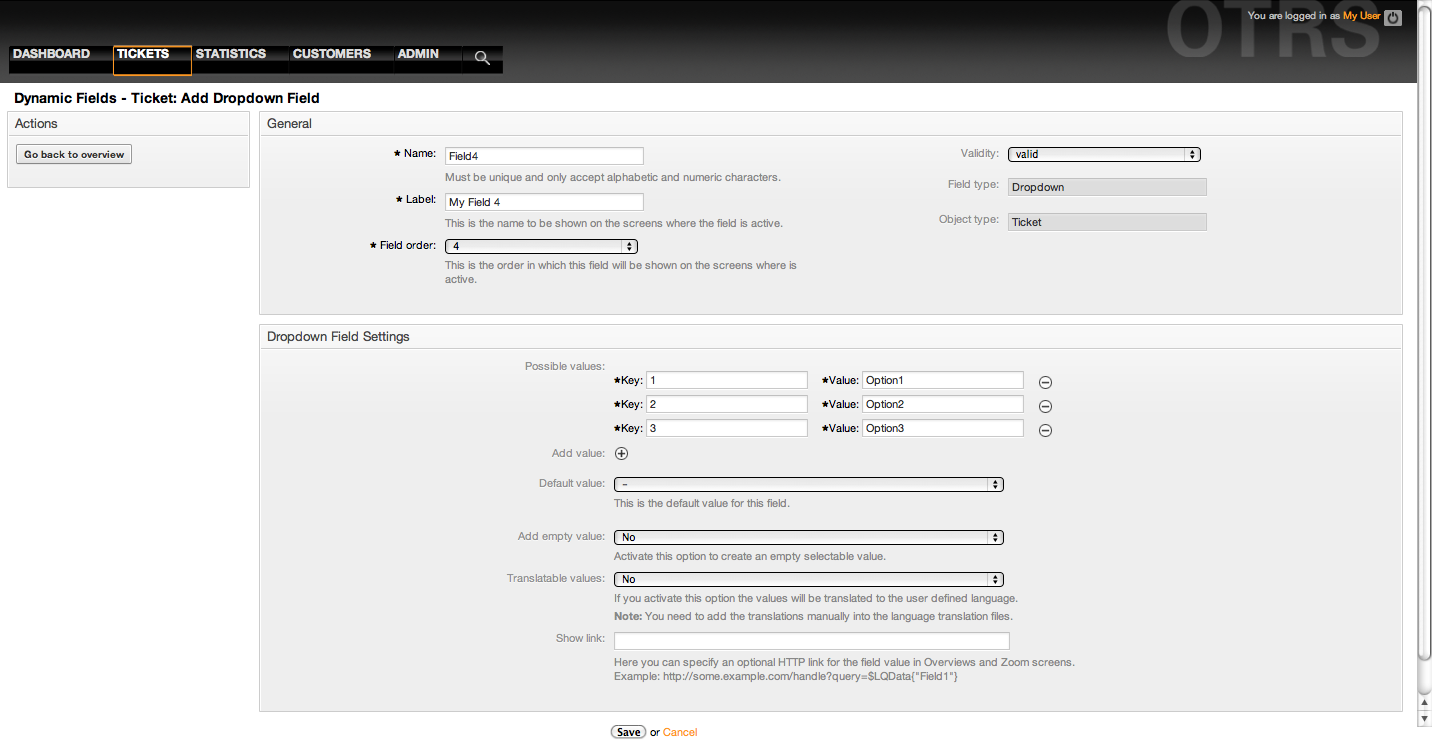
Figure: Dynamic field Dropdown configuration dialog.
Multiselect dynamic field is used to store a multiple values, from a closed list.
Multiselect dynamic field settings:
Possible values: Mandatory.
List of values to choose. when add a new value is necessary to specify the Key (internal value) and the Value (display value).
Default value: Optional.
This is the value to be show by default in the edit screens (like New Phone Ticket or Ticket Compose), the default value for this field is closed selection defined by the Possible values.
Add empty value: Mandatory, (Yes / No).
If this option is activated an extra value is defined to show a "-" in the list of possible values, this special value is empty internally.
Translatable values: Mandatory, (Yes / No).
This setting is used mark the possible values of this field to be translated. Only the display values are translated, internal values are not affected, the translation of the values needs to be manually added to the language files.
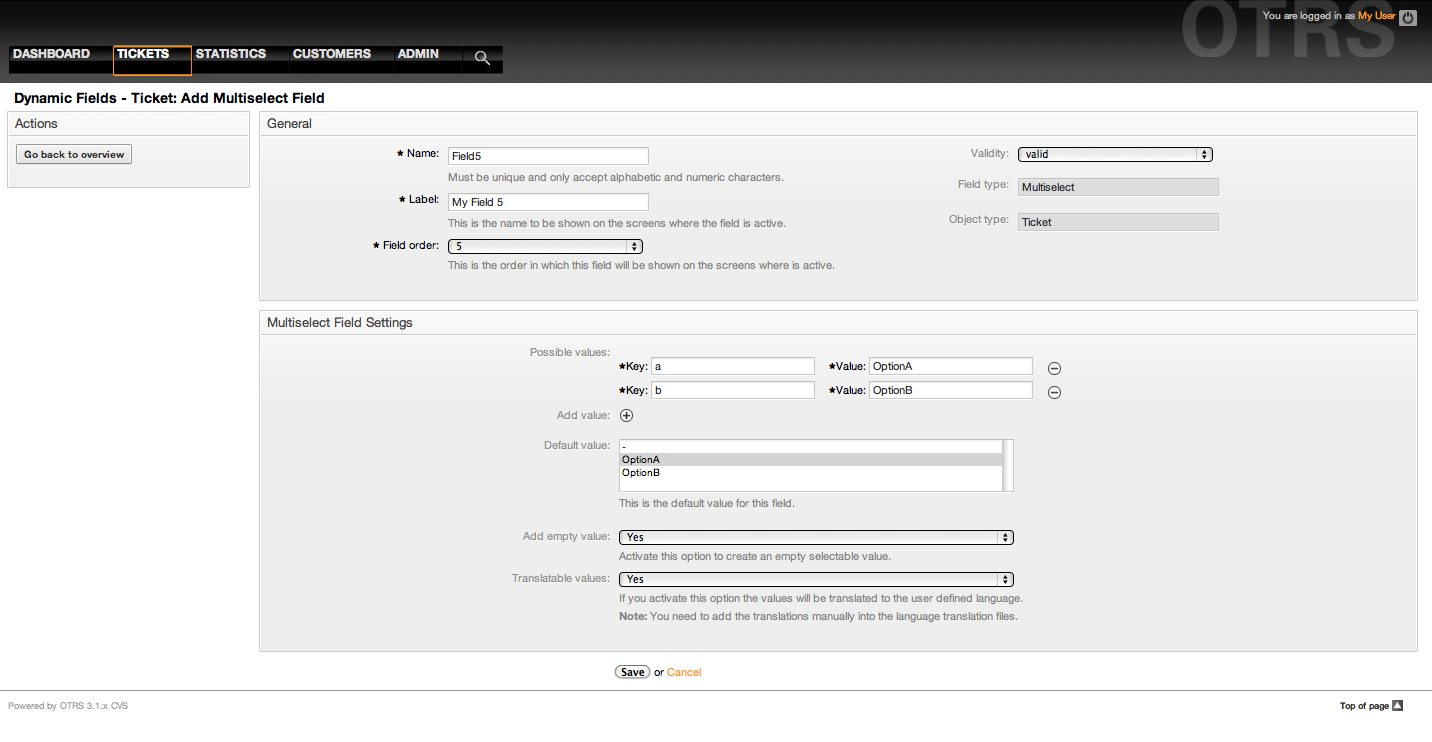
Figure: Dynamic field Multiselect configuration dialog.
Date dynamic field is used to store a date value (Day, Month and Year).
Date dynamic field settings:
Default date difference: Optional, Integer.
Number of seconds (positive or negative) between the current date and the selected date to be show by default in the edit screens (like New Phone Ticket or Ticket Compose).
Define years period: Mandatory (Yes / No).
Used to set a defined number of years in past and future from current date in the year select of this field, If set to Yes the following options are available:
Years in the past: Optional, Positive integer.
Define the number of years in past from current day to display in the year selection for this dined in edit screens.
Years in the future: Optional, Positive integer.
Define the number of years in future from current day to display in the year selection for this dined in edit screens.
Show link: Optional.
If set, the field value will be converted into a clickable HTP link for display screens (like Zoom or overviews).
For example, if Show link is set to "http://www.otrs.com", clicking on the filed value will make your browser to open the OTRS web page.
Note
The use of $LQData{"NameX"} in the Set link value, where NameX is the name of the field will add the field value as part of the link reference.
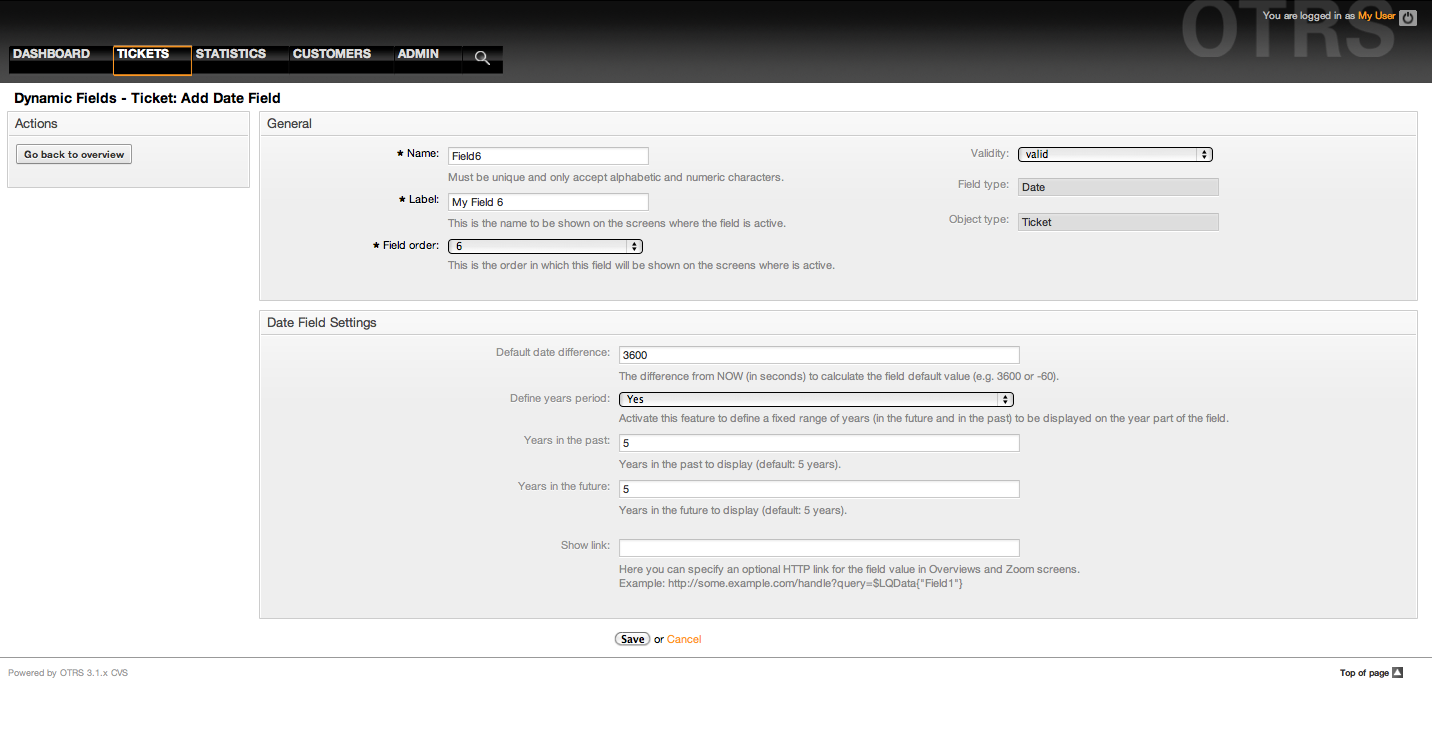
Figure: Dynamic field Date configuration dialog.
Date / Time dynamic field is used to store a date time value (Minute, Hour, Day, Month and Year).
Date / Time dynamic field settings:
Default date difference: Optional, Integer.
Number of seconds (positive or negative) between the current date and the selected date to be show by default in the edit screens (like New Phone Ticket or Ticket Compose).
Define years period: Mandatory (Yes / No).
Used to set a defined number of years in past and future from current date in the year select of this field, If set to Yes the following options are available:
Years in the past: Optional, Positive integer.
Define the number of years in past from current day to display in the year selection for this dined in edit screens.
Years in the future: Optional, Positive integer.
Define the number of years in future from current day to display in the year selection for this dined in edit screens.
Show link: Optional.
If set, the field value will be converted into a clickable HTP link for display screens (like Zoom or overviews).
For example, if Show link is set to "http://www.otrs.com", clicking on the filed value will make your browser to open the OTRS web page.
Note
The use of $LQData{"NameX"} in the Set link value, where NameX is the name of the field will add the field value as part of the link reference.
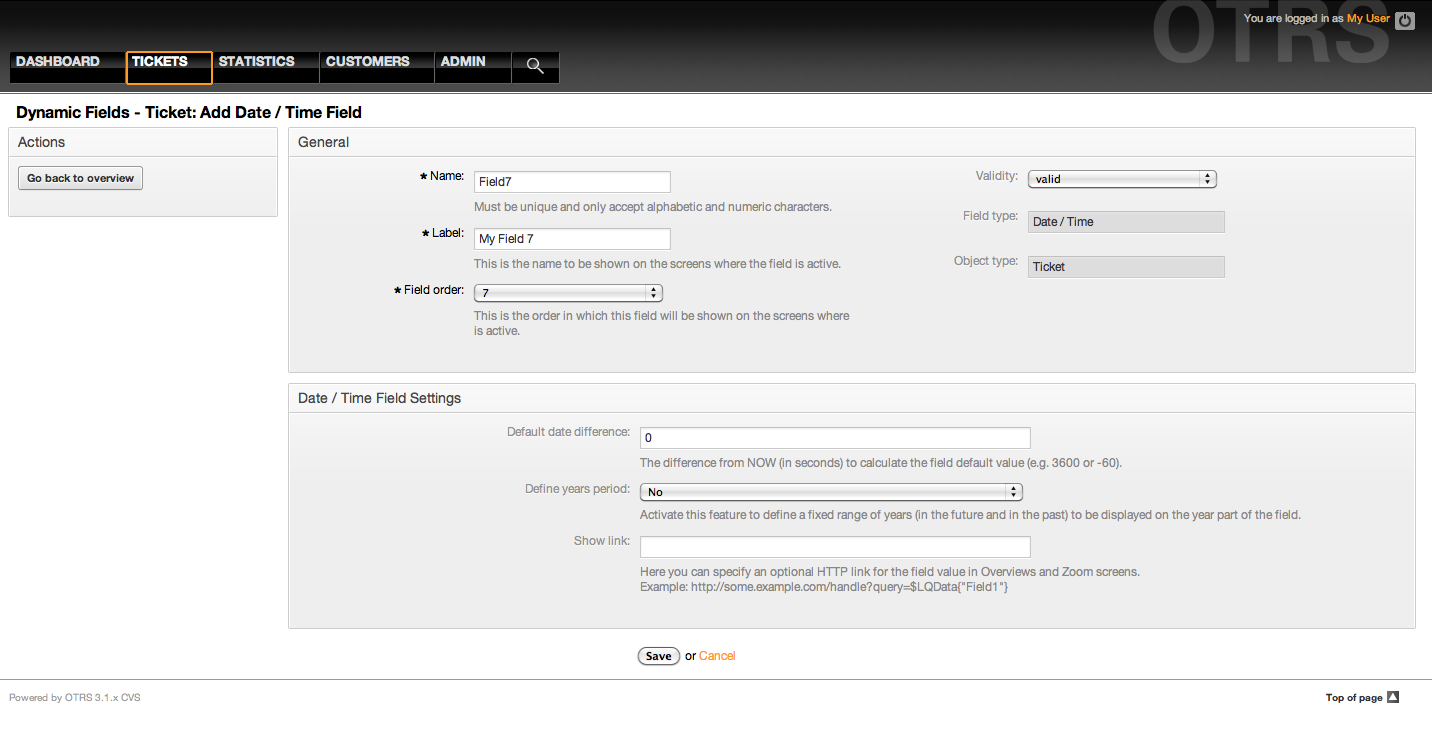
Figure: Dynamic field Date / Time configuration dialog.
A filled dynamic field overview screen (with the previous examples) should look like:
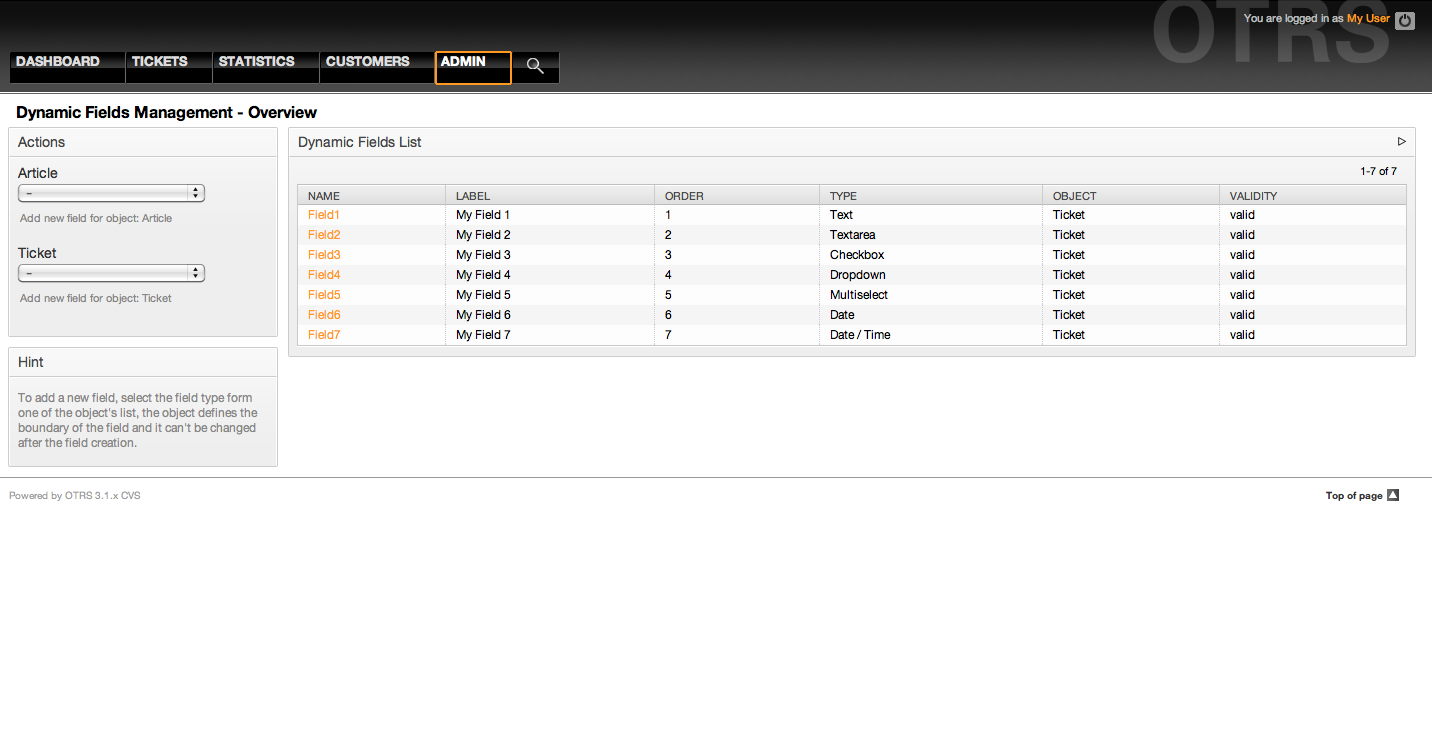
Figure: Dynamic field overview screen filled with sample data.
To change or edit a dynamic field you must have at least one field defined, select an already added field from the dynamic fields overview screen and update it's settings.
Note
Not all the dynamic field settings can be changed, the Field type and Object type are fixed from the selection of the field and they can't be changed.
It is not recommended to change the field internal name, but the label can be changed at any time. If internal name is changed all "SysConfig" settings that has a reference to that particular field needs to be updated as well as user preferences (if defined).
To display a dynamic field on a particular screen there are two mandatory conditions:
The dynamic field must be valid.
The dynamic field must be set to 1 or 2 in the configuration of the screen.
Follow this steps to show a dynamic field in a screen
Be sure that the dynamic field is set to valid, you can see the validity of the field from the dynamic field overview screen. Set to valid by editing the field if necessary.
Open the "sysconfig" and select "Ticket" from the dropdown list in the Actions side bar located in the left part of the screen.
Note
You can also search for "DynamicField" in the search box above or the "sysconfig" key directly if you already know it.
Locate the setting sub-group for the screen that you are looking for and click on it. For example "Frontend::Agent::Ticket::ViewPhoneNew".
Search for the setting that ends with "###DynamicField". For example "Ticket::Frontend::AgentTicketPhone###DynamicField".
If the setting is empty or does not have the required dynamic filed name, click on the "+" button to add a new entry. For example Key: Field1, Content: 1.
If the setting already has the dynamic field name listed be sure that is set to "1" to display the field or to "2" to display it as mandatory.
Save the configuration by clicking in the "Update" button and the bottom of the screen and navigate to the screen where you want the field to be displayed.
The following are "sysconfig" configurations examples to show or hide dynamic fields on different screens.
Example 22.1. Activate Field1 in New Phone Ticket Screen.
Group: Ticket
Sub-group: Frontend::Agent::Ticket::ViewPhoneNew
Setting: Ticket::Frontend::AgentTicketPhone###DynamicField
Value:
KeyContentField11
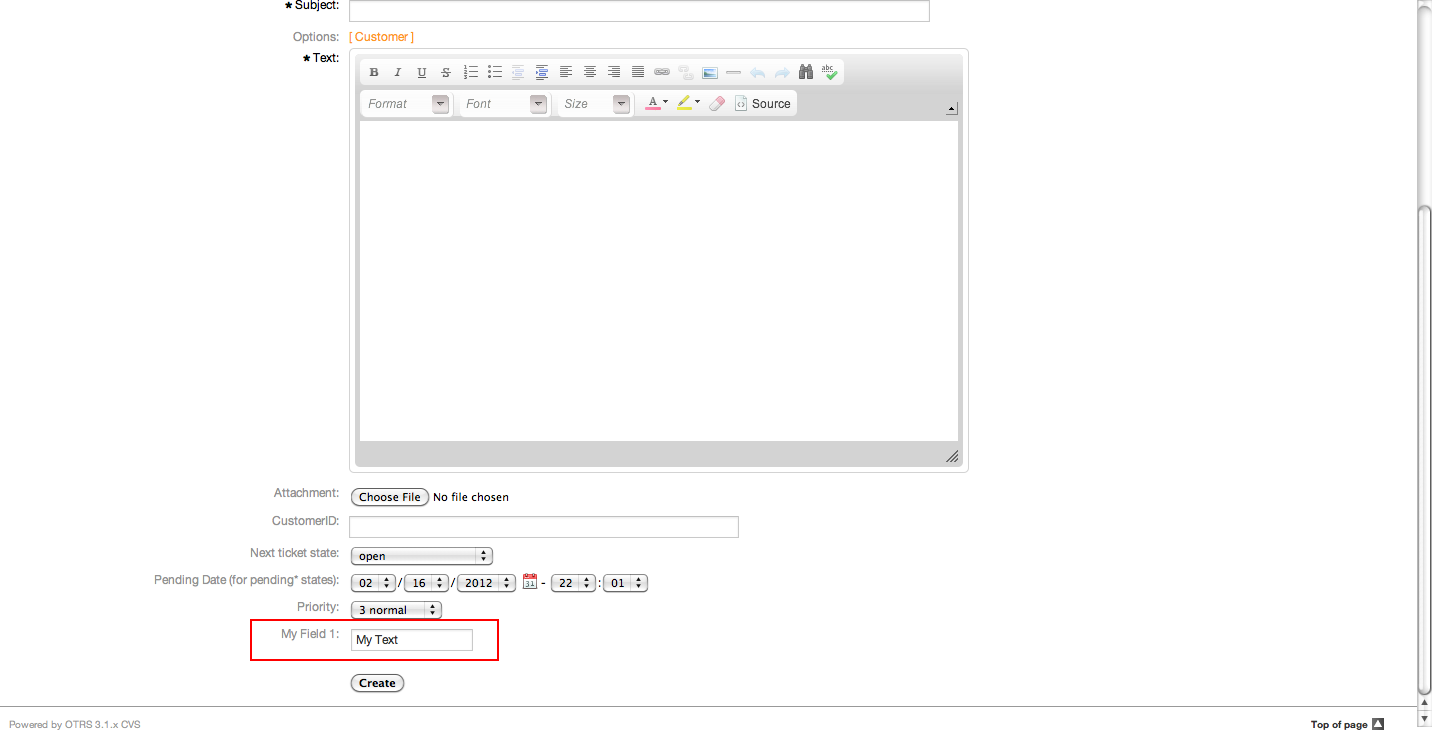
Figure: Field1 in New Phone Ticket Screen.
Example 22.2. Activate Field1 in New Phone Ticket Screen as mandatory.
Group: Ticket
Sub-group: Frontend::Agent::Ticket::ViewPhoneNew
Setting: Ticket::Frontend::AgentTicketPhone###DynamicField
Value:
KeyContentField12
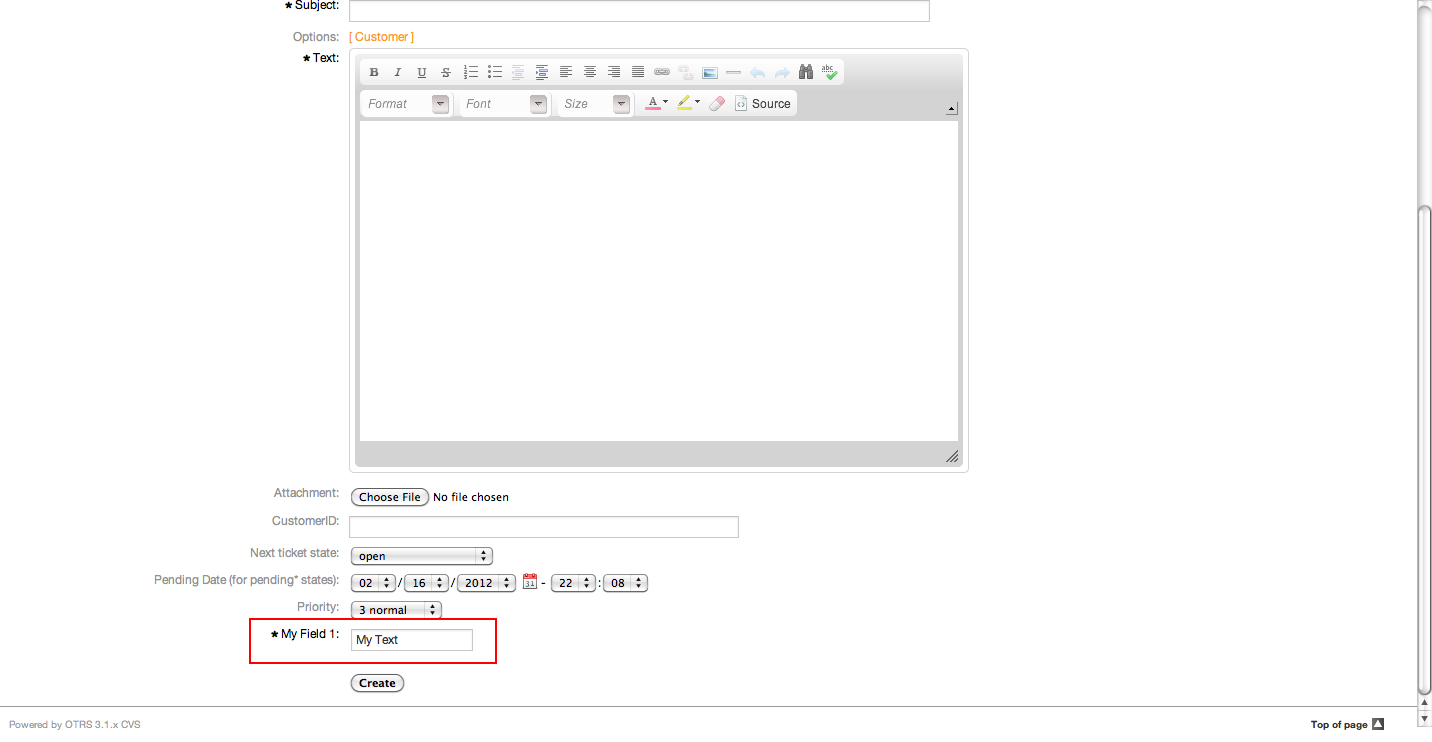
Figure: Field1 in New Phone Ticket Screen as mandatory.
Example 22.3. Activate several fields in New Phone Ticket Screen.
Group: Ticket
Sub-group: Frontend::Agent::Ticket::ViewPhoneNew
Setting: Ticket::Frontend::AgentTicketPhone###DynamicField
Value:
KeyContentField11Field21Field31Field41Field51Field61Field71

Figure: Several fields in New Phone Ticket Screen as mandatory.
Example 22.4. Deactivate some fields in New Phone Ticket Screen.
Group: Ticket
Sub-group: Frontend::Agent::Ticket::ViewPhoneNew
Setting: Ticket::Frontend::AgentTicketPhone###DynamicField
Value:
KeyContentField11Field20Field31Field40Field51Field60Field71
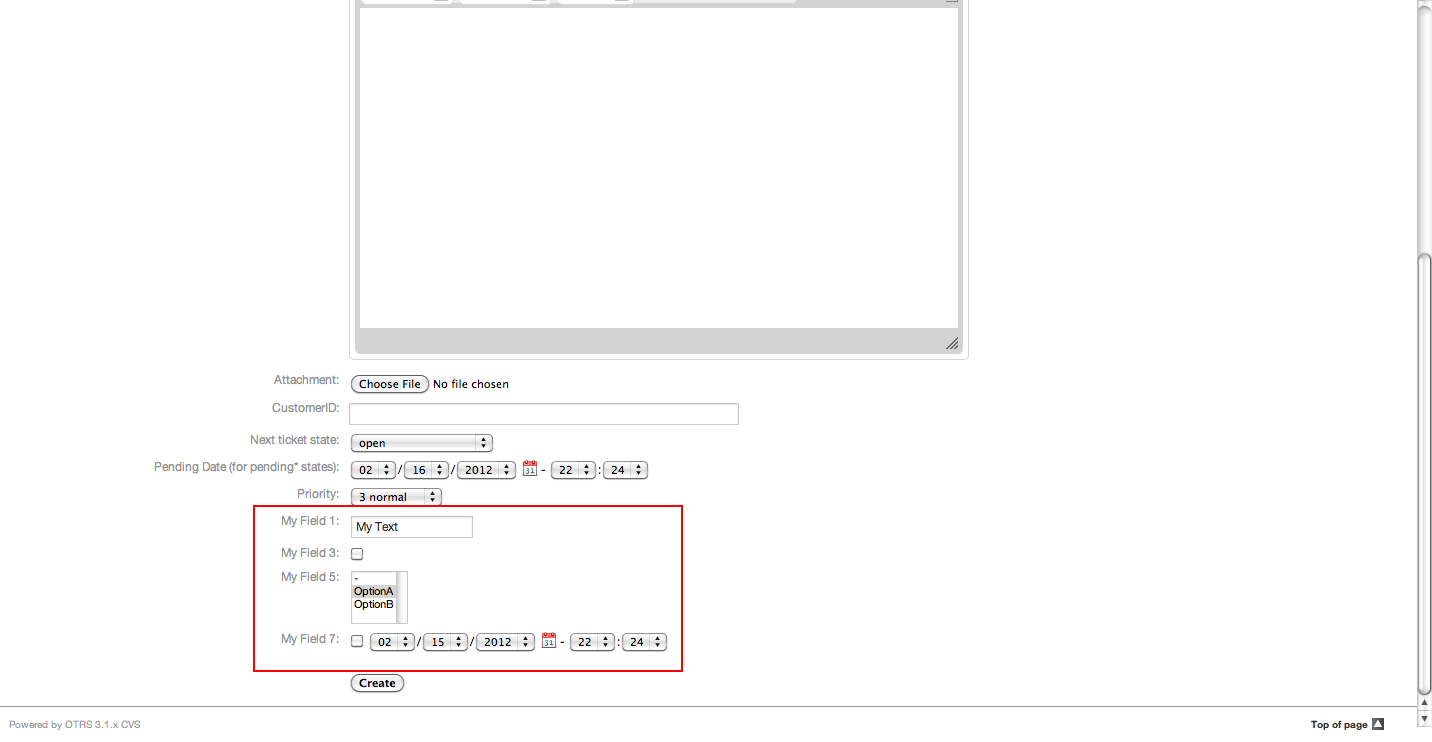
Figure: Some deactivated fields in New Phone Ticket Screen as mandatory.
Example 22.5. Activate Field1 in Ticket Zoom Screen.
Group: Ticket
Sub-group: Frontend::Agent::Ticket::ViewZoom
Setting: Ticket::Frontend::AgentTicketZoom###DynamicField
Value:
KeyContentField11
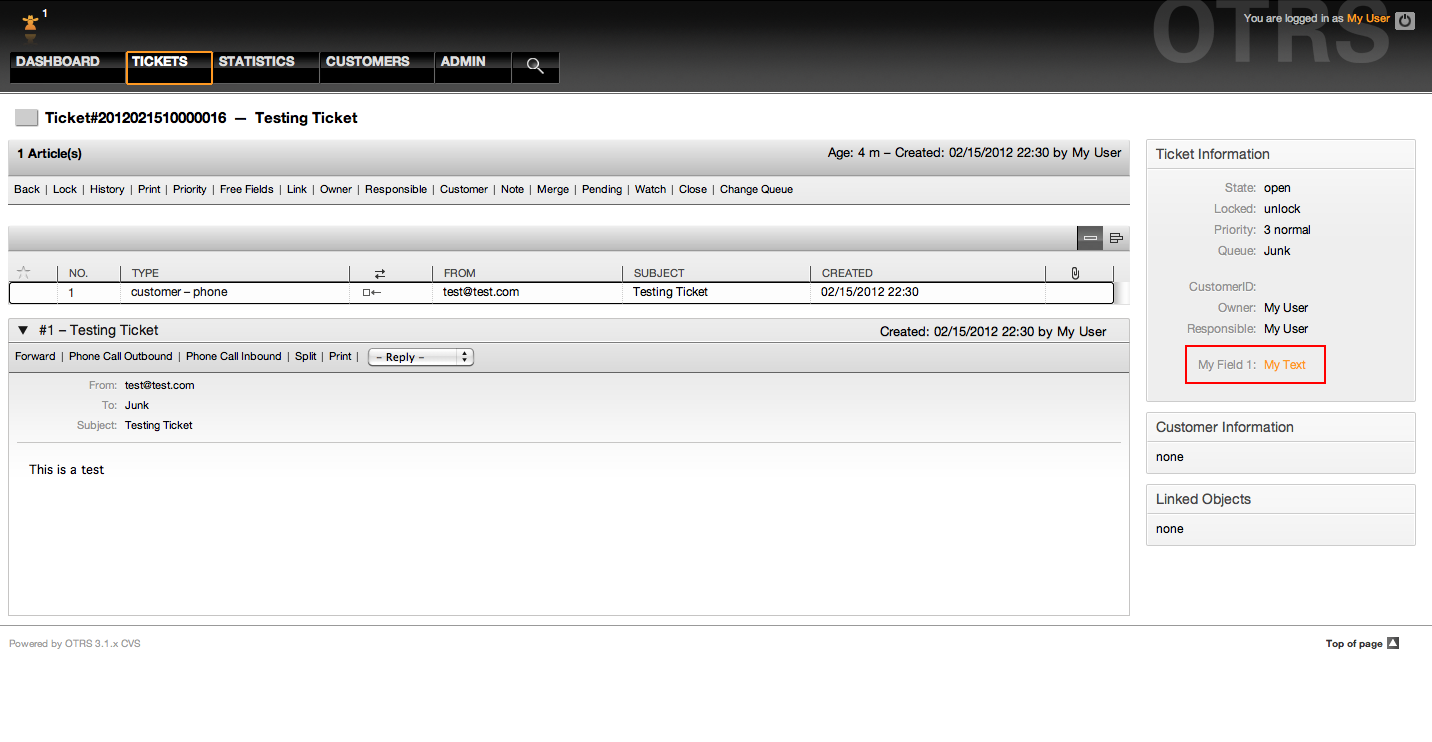
Figure: Field1 in Ticket Zoom Screen.
Example 22.6. Activate Field1 in Ticket Overview Small Screens.
Group: Ticket
Sub-group: Frontend::Agent::TicketOverview
Setting: Ticket::Frontend::OverviewSmall###DynamicField
Value:
KeyContentField11
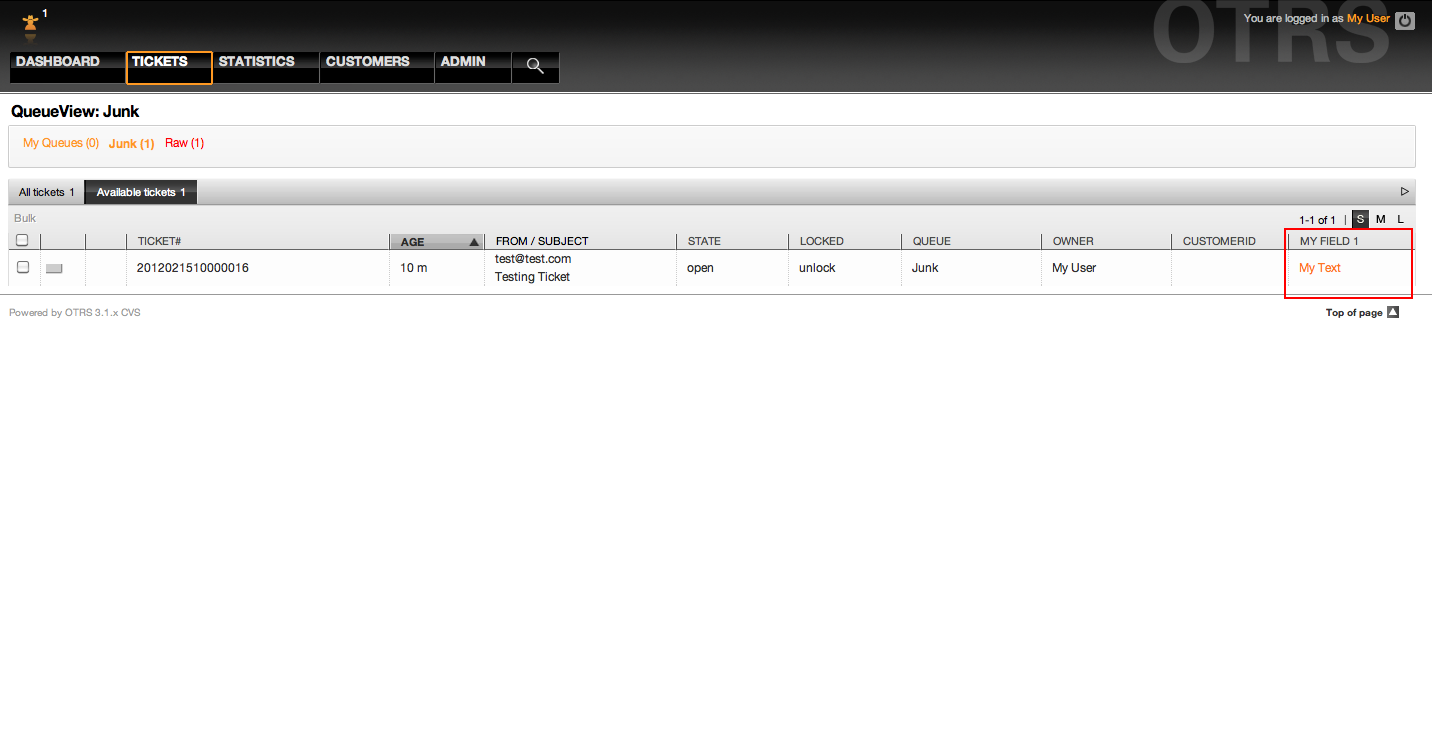
Figure: Field1 in Ticket Overview Small Screen.
This setting affects: Escalation View, Locked View, Queue View, Responsible View, Status View and Watch View screens.
A ticket event (e.g. TicketCreate) can trigger a value set for a certain field, if the field does not have a value yet.
Note
By using this method this default value, is not seen in the edit screen (e.g. New Phone Ticket) since the value is set after the creation of the ticket.
To activate this feature is necessary to enable the following setting: "Ticket::EventModulePost###TicketDynamicFieldDefault".
Example 22.7. Activate Field1 in TicketCreate event.
Group: Ticket
Sub-group: Core::TicketDynamicFieldDefault
Setting: Ticket::TicketDynamicFieldDefault###Element1
Note
This configuration can be set in any of the 16 Ticket::TicketDynamicFieldDefault###Element settings.
If more that 16 fields needs to be set up a custom XML file must be places in $OTRS_HOME/Kernel/Config/files directory to extend this feature.
Value:
KeyContentEventTicketCreateNameField1Valuea new value
The dynamic field default value can be overwritten with a user defined value stored in the user preferences.
Using this method, the default value of the field will be shown on any screen where the field is activated (if the field does not have already a different value).
The "sysconfig" setting "PreferencesGroups###DynamicField" located in the "Frontend::Agent::Preferences" Sub-group. This setting is an example of how to create an entry in the User Preferences screen to set an exclusive dynamic field default value for the selected user. The limitation of this setting is that it only admits one dynamic field. if two or more fields will use this feature is necessary to create a custom XML configuration file to add more settings similar to this one.
Note
Remember, if more settings are added in a new XML each setting name needs to be unique in the system and different than "PreferencesGroups###DynamicField". for example: PreferencesGroups###101-DynamicField-Field1, PreferencesGroups###102-DynamicField-Field2, PreferencesGroups###My-Field1, PreferencesGroups###My-Field2, etc.
Example 22.8. Activate Field1 in the User preferences.
Group: Ticket
Sub-group: Frontend::Agent::Preferences
Setting: PreferencesGroups###101-DynamicField-Field1
Value:
KeyContentEventTicketCreateActive1BlockInputColumnOther SettingsData:$Env{"UserDynamicField_Field1"}Key:My Field 1Label:Default value for: My Field 1Module:Kernel::Output::HTML::PreferencesGenericPrefKey:UserDynamicField_Field1Prio:7000
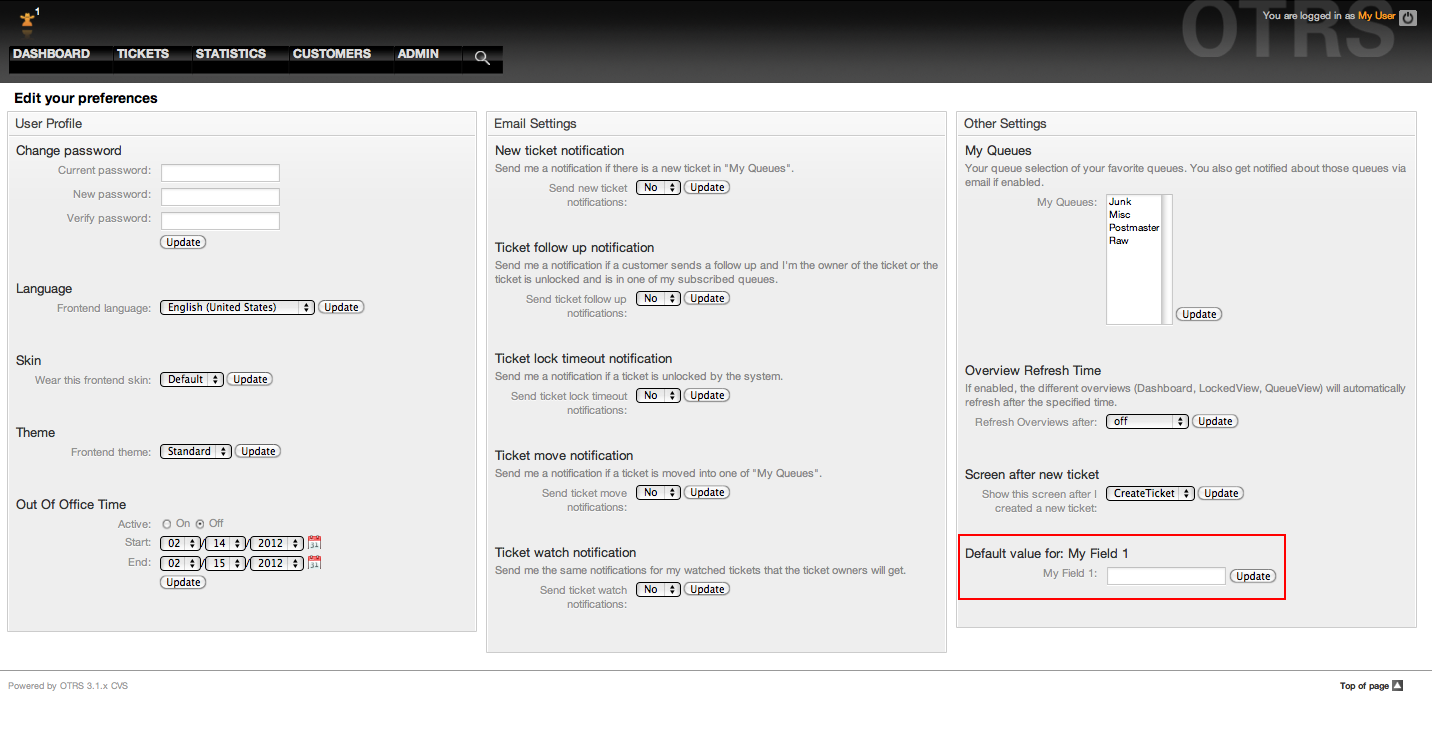
Figure: Field1 in User preferences screen.
During the update from OTRS 3.0 there is an special step that is very important and must not be skipped, there is an script file named "DBUpdate-to-3.1.pl" under the "$OTRS_HOME/scripts" that must be called at the precise time in the update procedure (please refer to UPGRADING file for more details).
The script mentioned above is in charge to get all the "Free fields" configurations and creates their dynamic field substitute, it also gathers each "Free field" data from every ticket and article and move it to the dynamic fields format. It also read the screen configuration for "Free fields" and port it to the dynamic fields format.
Note
All the "Free fields" configurations are keep in the system but they are not used anymore, they are placed under the group "Z_Deprecated", and the might be removed in further versions of OTRS.
While the updating script tries to be very precise migrating the screen configurations it is always good to do a manual fine tuning. Please note that "Free fields" TicketFreeKey[1-16] and TicketFreeText[1-16] came always in pair in OTRS 3.0 systems (and before). This is not longer necessary it could be that the TicketFreeKey field is not necessary anymore for a particular TicketFreeText field.
The dynamic fields overview screen from clean OTRS 3.0.x updated to 3.1.x should look like:
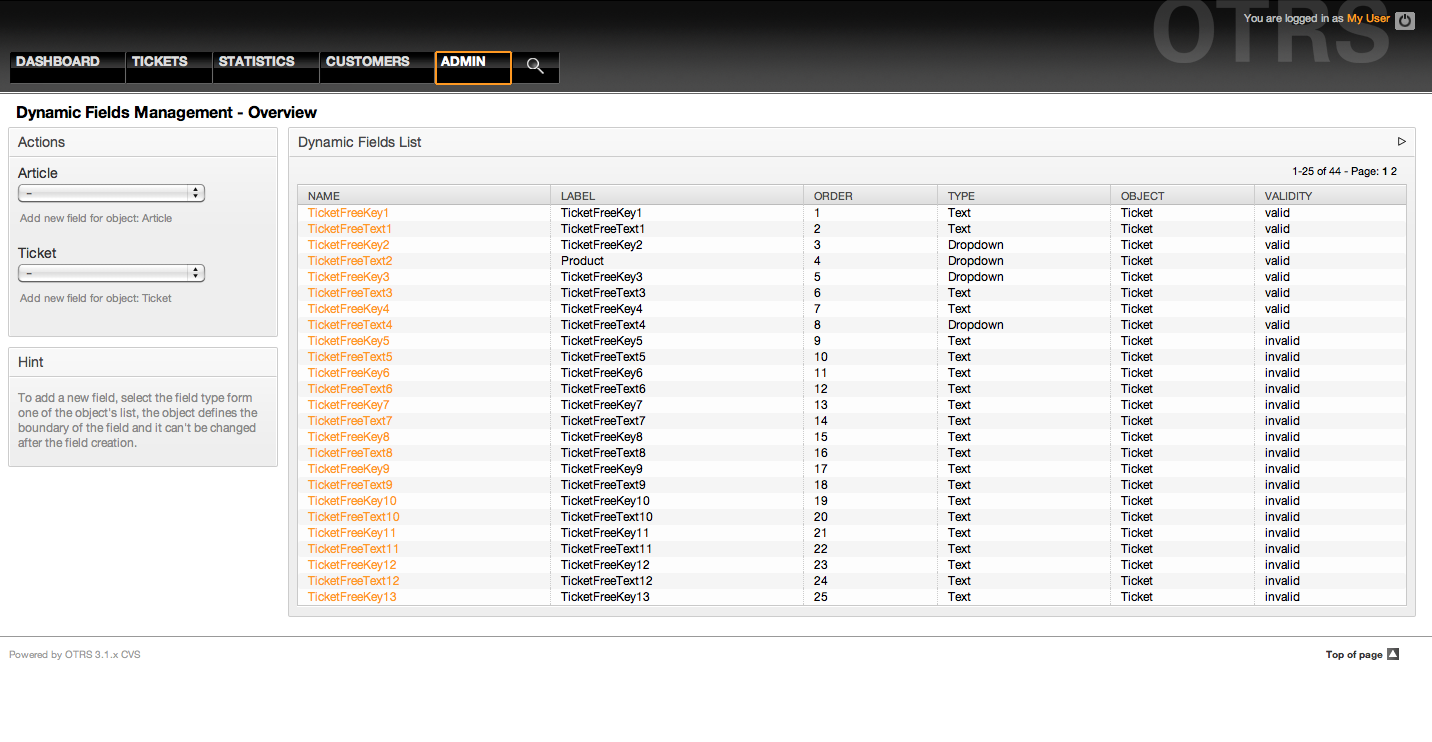
Figure: Updated dynamic field overview screen page2.
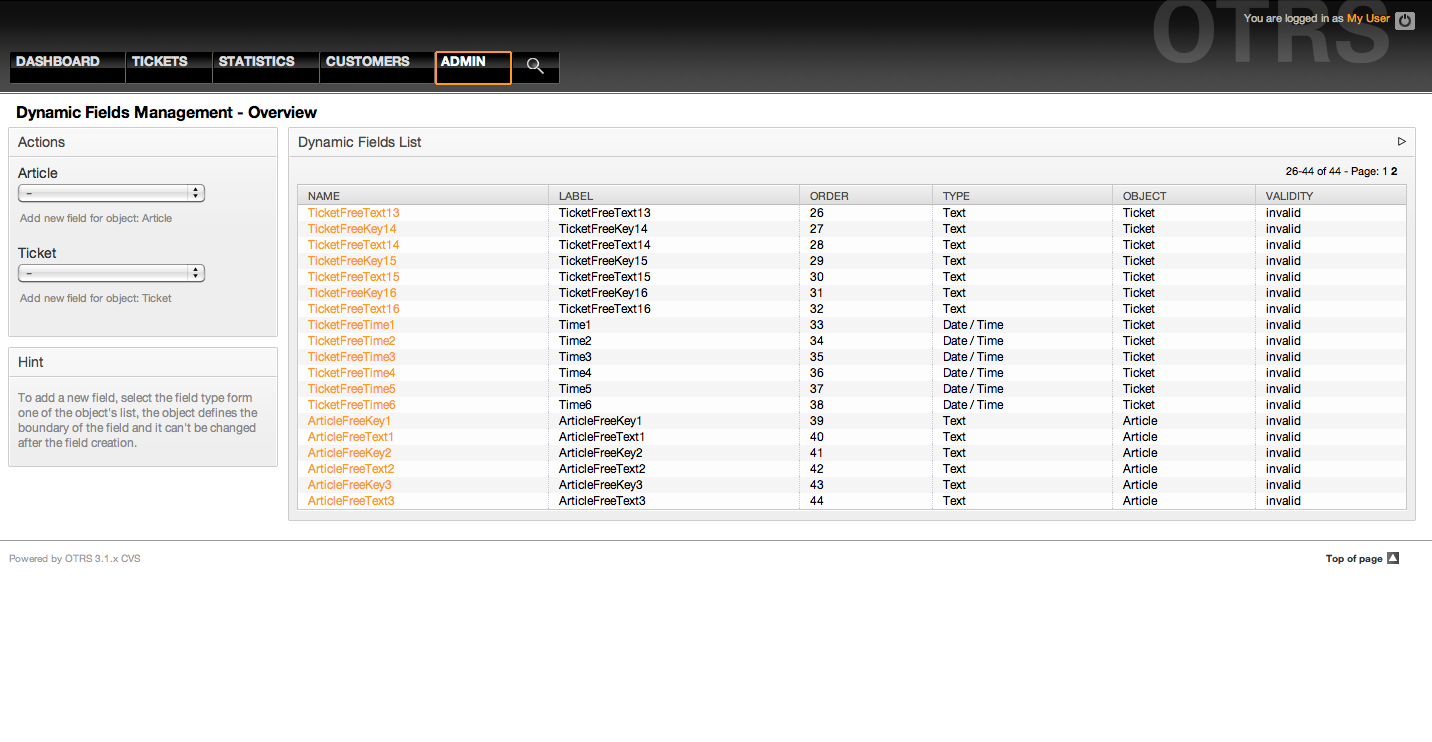
Figure: Updated dynamic field overview screen page2.
Please note that the new dynamic field named "TicketFreeText2" has the label "Product", this is because the default configuration from this "Free field" in OTRS 3.0.x specifies that "TicketFreeKey2" has a fixed value of "Product". in this case the dynamic field "TicketFreeKey2" is not needed anymore and it can be manually set to invalid.
It might me also a very good idea to set the label value of each valid migrated field to a text that describes better the use of the field in the system.